RyanSterling's Mods

RyanSterling

Suspension Mod Evangelist
Hey guys, my work schedule is finally returning to normal so I have made it a point to try and document the mods I have made since getting my bike in December. I will be doing one post per major mod and then adding detail as requested or as I get new pics and collect info.

As always if anyone has any questions, let me know and I will be happy to help however I can.

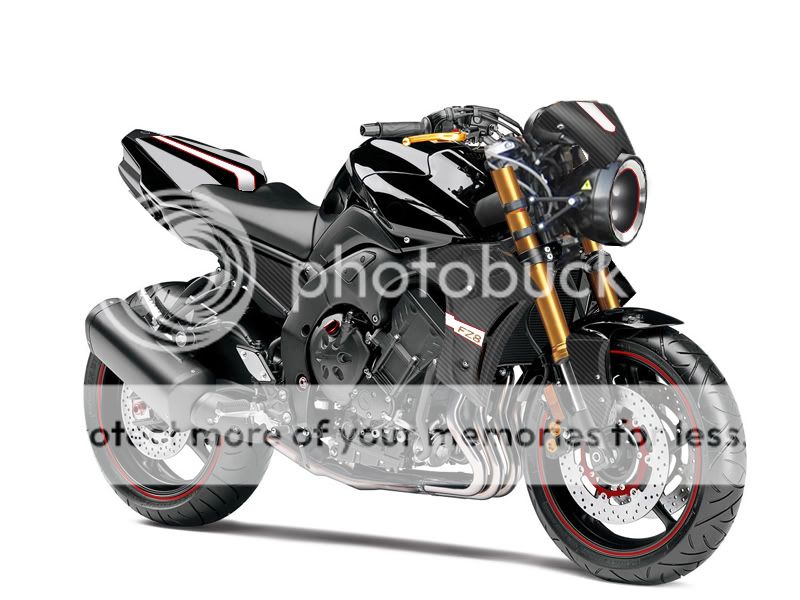
I think most have seen the rendering I did by now, but to give you an idea of what my end goal is. Here it is again.
 

Koeke

New member
I like it very much. Except the round headlight, the original headlight is more aggressive I think.


Sent from my iPhone using Tapatalk
 

RyanSterling

Suspension Mod Evangelist
7' Headlight

The most obvious mod I have made so far is of course ditching the stock headlight. I just never liked it's insect like looks and wanted something a little more classic looking.

The light itself was made up of 5 major steps.

1. The bucket is a classic Lucas style 7" bucket typically found on british bikes. (being a Triumph guy normally this seemed like an obvious choice)

2. The "reflector" was ordered from ebay
http://www.ebay.com/itm/7-LED-WHITE...ies&hash=item5649e2b8c7&vxp=mtr#ht_2163wt_855
It came with a glass lens, which would not allow me to open it and use an HID projector. So I had to crack off the stock glass lens and start searching for a 7" headlight that came with a polycarbonate lens. This search took longer than any other part of the project. To be honest it was a pain in the a@#. I also, painted the inside black to follow the rendering.

3. The lens, a company called "Trucklite" makes a 7" with a poly lens so I ordered one of those as well. I then put it in the oven and removed the lens and set it aside in a safe covered place for later.

4. Projector - I ordered a projector from KT autopart http://www.ktautopart.com/product/showproduct.php?id=212&lang=en
I have to admit were I to do it again I would probably go a different route. I had to fix several things on the one I received. And, some of the LED strips I ordered didn't work at all when they arrived.

5. The mounting tabs I cut out of 6061 aluminium using a design I made in Illustrator. I will add more pictures to this section as I get them. Basically I just measured and mocked up the light best I could and transferred those measurements to vector drawings. Print outs were then temporarily glued to the aluminium and I broke out the jig saw and started cutting. They came out great but I am planning on making a set out of thicker material for purely aesthetic reasons. I also went online and ordered some M6 anodized hardware in gold. In my opinion using hardware that looks made for the bike is the kind of detail that makes a project look professional.

Here is a shot of how the light itself looks at night to give you an idea of the light pattern. The LEDS, are ridiculously bright which is great for visibility during the day.


The next step was modifying the bike itself. This included lowering the gauge cluster about 3/4 of an inch as well as re-running some of the wiring. The main issue was that you would be able to see some of it behind the headlight bucket. So I wanted to clean it up as much as possible and re-loom some of it so that it could be tucked into the bucket. Here is all of the wiring cleaned up and ready for the new bucket to be installed.


The first thing I did was call my local dealership and order extra parts. I always like to have replacements for any factory part I will be cutting and I also like to use the original hardware. This means that I can go back to stock in about an hour if need be.

The stock gauge mount was too high in my opinion for the new lines of the front of the bike. I also needed to trim off the sides where is met up with the stock headlight surround. I will include better pictures of this step when I tear it back down for powdercoating. But this gives you an idea of what was done.


Once everything was all together I needed to make side covers that would not only give space for the turn signals but also fill the gap between the bucket and the flyscreen. I made the out of polycarbonate by first making a paper template and them cutting them out and some slight thermoforming using the trusty old heat gun.


To have them match the other finishes on the bike I wrapped them in 3M Scotchprint Carbon fiber vinyl. (this is the same vinyl I wrapped the radiator covers, gauge cluster, rear mudguard, and side covers in as well. It is also the same material used for the stripe down the bike but that is white carbon fiber)


A lot of people talk crap about the vinyl wrapping but as someone who has done a lot of composites fabrication I actually prefer the more matte look of the vinyl. And it is definitely easier to do.

[ need to upload a close-up shot of the finished headlight and gauge area ]
 
Last edited:

jumb5150

Member
Hey guys, my work schedule is finally returning to normal so I have made it a point to try and document the mods I have made since getting my bike in December. I will be doing one post per major mod and then adding detail as requested or as I get new pics and collect info.

As always if anyone has any questions, let me know and I will be happy to help however I can.

I think most have seen the rendering I did by now, but to give you an idea of what my end goal is. Here it is again.

Just plain sexy.
 

Guillaume

Member
Hey guys, my work schedule is finally returning to normal so I have made it a point to try and document the mods I have made since getting my bike in December. I will be doing one post per major mod and then adding detail as requested or as I get new pics and collect info.

As always if anyone has any questions, let me know and I will be happy to help however I can.

I think most have seen the rendering I did by now, but to give you an idea of what my end goal is. Here it is again.

That's an great look. Do you have a picture of your finished bike?
If ever you don't know what to do with it, I'd buy that light from you, but with the BKmoto HID instead. The styling is awesome.
Where did you find those radiator shrouds?
Lastly, I'd relocate the horn... or just get a danmoto straight pipe... does the work for me.
 

SpunkyTheTuna

New member
Very interesting. Really want to see finished pics. I like what you're doing with the headlight. In my opinion the headlight is the weakest part of the overall design of the bike. Also interested in seeing more shots showing the stripe.
 

sinclap2

Lazy
Dang! That looks great. Even the WIP shots the bike look good. Nice job.

I'll be watching this one for sure!:eatcorn:
 
C

Camo

Guest
I'm sure he had a crash a few months ago and hasn't popped back up since?
 

n8kdfz8

New member
Wow!! sweet bike man! I was thinkin "thats a bad a** rendering of a bike" then i scroll down to see how far u got with it so far and OMG:eek:......breathless :D
 

RyanSterling

Suspension Mod Evangelist
Thanks Man, I did it a while ago and still very happy with the change in appearance. I recently started a new project (car build/restoration) so I haven't been giving the bikes much love lately. Other than just riding the crap out of em. Might be about time to take a break on the car though and do some more bike stuff. I like to switch it around so as not to get bored.

Anyways, sorry it's been a while and thanks again.
 

Guillaume

Member
Thanks Man, I did it a while ago and still very happy with the change in appearance. I recently started a new project (car build/restoration) so I haven't been giving the bikes much love lately. Other than just riding the crap out of em. Might be about time to take a break on the car though and do some more bike stuff. I like to switch it around so as not to get bored.

Anyways, sorry it's been a while and thanks again.

Hehe, people were worried you crashed! You got some recent pics of your bike though?
 

RyanSterling

Suspension Mod Evangelist
naw, went down but wasn't anything too serious. I wasn't hurt and the bike was fine as well. I've just been concentrating on a new project so the Yammy is on the back burner. I will be out in the garage later today working on a buddies bike so I can snap some for you guys then.
 
H

Hoover

Guest
naw, went down but wasn't anything too serious. I wasn't hurt and the bike was fine as well. I've just been concentrating on a new project so the Yammy is on the back burner. I will be out in the garage later today working on a buddies bike so I can snap some for you guys then.

Please do. Would live to see it now.
 

RyanSterling

Suspension Mod Evangelist
As promised, sorry about the quality. Crappy weather here in LA at the moment and I needed to get to work on my buddies GS so I just snapped some quick cellphone shots.
 

Guillaume

Member
As promised, sorry about the quality. Crappy weather here in LA at the moment and I needed to get to work on my buddies GS so I just snapped some quick cellphone shots.

Dude that's sweet already. How's the light output?
Snow season is coming in for me, I won't have time to work on the bike anymore...
 

RyanSterling

Suspension Mod Evangelist
Thanks guys, the light output is pretty damn good actually. A larger projector would probably be better but I have never felt like I was having trouble seeing at night, and during the day you can see it for miles. Which, in LA traffic is handy.

The fastback in the background is what has kept me from the bikes lately. Doing a full restoration/modification on it so it's going to be a while.

That being said I have been playing with the idea of tearing the FZ town ad going with a 1940's aviation theme. Army green, brushed metals, and brown leather. Just need to draw it so I can see if I want to build it.
 
Top